What Is Tolerance In Engineering?
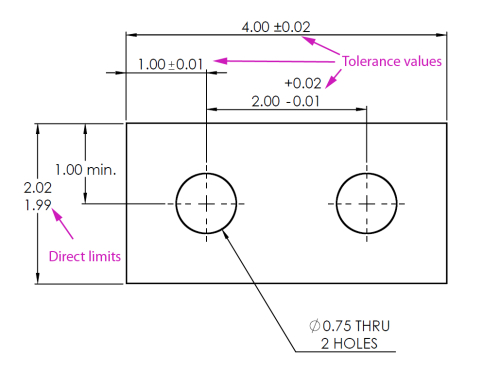
In engineering, tolerance measures unexpected machined part dimension errors. Perfect accuracy is difficult even with the most accurate CNC machines, which causes unavoidable mistakes. Tolerance defines both upper and lower limitations on the degree of variation a dimension may experience from its inherent value.
Importance of Tolerances in Production
- Practicality and Universality: tolerances make it easy to know what kinds of variations from the exact size are allowed when cutting.
- Managing Costs and Resources: Tolerance limits allow engineers to pick between precision gear and standard equipment, making the best use of time, money, and resources. For instance, a standard machine can make a part with a range of +/- 1 mm, so a precise CNC machine is not needed.
- Controlling quality: tolerances help maintain quality by ensuring that parts meet the requirements. Advanced methods such as tolerance stacking are used to ensure measurements are within accepted ranges.
- Part interchangeability: Tolerances keep bulk-produced parts interchangeable, ensuring assembly uniformity and functioning. For example, tolerance levels for auto parts must be met to make sure they fit and work right in different vehicles.
Different Tolerancing Strategies in Engineering Drawings
Various methods are employed in technical drawings to specify tolerances, ensuring clear communication and accurate manufacturing.
Direct Limits

Direct limits specify the minimum and maximum allowable sizes for a dimension. This method is popular for its clarity and space-saving attributes. However, it doesn’t reveal the base dimension, which can be inconvenient when precise information is needed.
If a dimension is specified with direct limits as 50.0 – 50.2 mm, the part must fall within these bounds, ensuring it is neither smaller than 50.0 mm nor larger than 50.2 mm.
Plus and Minus Tolerances
Plus and minus tolerances indicate allowable deviations from a base value. This approach provides detailed information but can make drawings cluttered. It includes:

- Unilateral Tolerances: Deviations on one side of the base dimension (either positive or negative). If a dimension is specified as 50.0 mm with a tolerance of +0.2 mm / -0 mm, the part can be up to 50.2 mm but not smaller than 50.0 mm.
- Bilateral Tolerances: Deviations on both sides of the base dimension, showing both positive and negative variations. If a dimension is specified as 50.0 mm with a tolerance of ±0.1 mm, the part can range from 49.9 mm to 50.1 mm.
What Is Allowance In Engineering?

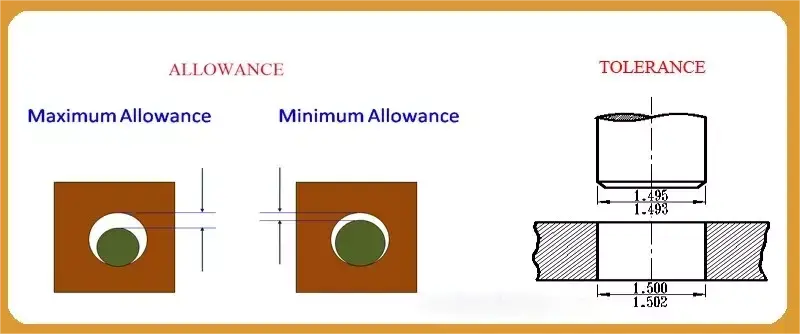
Allowance in engineering refers to the planned deviation in dimensions to achieve the correct fit between mating parts. It ensures that parts fit together properly, accounting for intentional gaps or overlaps. This concept is crucial in designing functional mechanical assemblies.
Allowance is a design feature that ensures parts fit together properly, accounting for intentional gaps or overlaps. For instance, in a shaft and hub assembly, allowance defines the necessary space or interference between the two parts.
Allowance and Engineering Fits
Allowances are critical for achieving the desired fit between mating parts, ensuring proper function and performance. There are three main types of fits: clearance fit, transition fit, and interference fit.
The allowance depends on the type of engineering fit desired. There are three main types of fits:

- Clearance Fit: There is a positive allowance, meaning a gap exists between the parts. For example, if the shaft diameter is 49.8 mm and the hole diameter is 50.0 mm, the allowance is +0.2 mm.
- Transition Fit: This is a combination of clearance and interference fits. If the shaft diameter is 50.0 mm with a tolerance of -0.05 mm and the hole diameter is 50.0 mm with a tolerance of +0.05 mm, the fit can vary between a slight clearance and a slight interference.
- Interference Fit: There is a negative allowance, meaning the parts overlap. For example, if the shaft diameter is 50.1 mm and the hole diameter is 50.0 mm, the allowance is -0.1 mm.
Importance of Allowance in Production
Allowances play a vital role in production, ensuring the proper function of engineering fits, accommodating manufacturing variations, facilitating assembly, and improving product quality. They work hand in hand with individual part tolerances to achieve desired results.
- Ensuring Proper Function: Properly defined allowances prevent assembly issues and ensure the longevity and performance of the final product. For example, in automotive manufacturing, the precise allowance between engine parts is crucial for efficient performance.
- Accommodating Manufacturing Variations: Allowances provide the necessary deviation to account for manufacturing variations and material properties. For instance, in aerospace engineering, slight deviations are accommodated to ensure safety and functionality.
- Facilitating Assembly: Correct allowances ensure parts fit together smoothly, reducing the need for rework. In electronics, accurate allowances allow for easy assembly of components on circuit boards.
- Improving Product Quality: By adhering to specified allowances, machinists can achieve the desired engineering fit, leading to high-quality, reliable products. For example, precision in medical device manufacturing is critical for patient safety and device efficacy.
- Relationship with Individual Part Tolerances: Individual part tolerances are chosen based on practical manufacturing constraints, and allowances ensure these parts work together properly. For instance, in a hub-shaft system, both parts have their tolerances, and the allowance ensures a proper fit despite these variations.

Get the exact results you need. Choose Zero Tolerance Machining—where precision meets your project’s demands.
Allowance Vs Tolerance: What Are The Differences?
Understanding the differences between allowance and tolerance is essential for accurate engineering design and production. While both concepts deal with dimensional variations, they serve different purposes and applications in the manufacturing process.
Allowance and tolerance are often confused, but they serve distinct roles in engineering. Allowance is a planned deviation for achieving proper fit, while tolerance manages unplanned deviations due to machining errors. The following chart summarizes their key differences:
| spect | Tolerance | Allowance |
| Definition | Tolerance refers to the permissible deviation from a defined dimension or feature of a mechanical part. | Allowance is the intentional gap between components of an assembly. |
| Purpose | Tolerance ranges help control quality by defining the acceptable variation range while accommodating manufacturing variability. | Allowance ensures mating parts fit correctly, considering variables such as thermal expansion, manufacturing variations, and lubrication. |
| Types | Upper limit (positive value) and lower limit (negative value). | Clearance (positive value) or interference (negative value). |
| Material and Lubrication Impact | Material and lubrication may influence the need for looser or tighter tolerances. | Material and lubrication may affect the ideal allowance values. |
| Adjustability | Engineering tolerances do not permit variability in part dimensions but allow for manufacturing variations. | Allowance in engineering permits varying levels of gap or overlap between mechanical parts to create the desired fit. |
| Function in Assembly | Defines the acceptable range of dimensions for features, parts, and assemblies. | Dictates the type of fit between mating parts. |
| Typical Application | Product engineers use tolerances to control the acceptable range of a mechanical part’s lengths, diameter, or other dimensions. | It is suitable for indicating how freely mating parts should move (clearance) or how they should be press-fitted (interference). |
Practical Implications in Engineering Design
Recognizing the differences between allowance and tolerance is crucial for making accurate and practical engineering designs. Misunderstanding these concepts can lead to production inefficiencies and functional issues in mechanical assemblies. Understanding and applying these concepts correctly can significantly enhance the quality, efficiency, and cost-effectiveness of manufacturing processes.
Ensuring Part Interchangeability
Understanding both concepts is vital for part interchangeability. Engineers often find that a misunderstanding of these principles can lead to parts that do not fit together, causing delays and additional costs.
In automotive manufacturing, clear allowances and tolerances ensure that parts from different suppliers fit together seamlessly, maintaining vehicle safety and performance.
Optimizing Performance
An accurate application of allowances and tolerances ensures optimal performance of the final product. Missteps in defining these can compromise product functionality and lifespan.
In aerospace engineering, precise tolerances are vital for ensuring the reliability and safety of critical components, while allowances accommodate necessary assembly fits.
Reducing Production Costs
Implementing correct tolerances can minimize the need for high-precision machinery, thereby cutting production costs. This is a significant advantage, as it balances the need for precision with cost-efficiency.
Properly defined tolerances can reduce the need for extremely precise machining processes, saving on production costs and time.
Enhancing Product Quality
Quality is directly tied to how well tolerances and allowances are understood and applied. Products that adhere to precise tolerances and allowances are generally more reliable and have fewer defects.
In medical device manufacturing, accurate allowances and tolerances ensure devices meet stringent safety standards, resulting in high-quality, reliable products.
Facilitating Efficient Assembly
Efficient assembly is often a result of well-defined tolerances and allowances. Engineers recognize that clear definitions can prevent assembly line bottlenecks and improve overall workflow.
In electronics, correct allowances and tolerances allow for the smooth assembly of components, reducing rework and increasing production efficiency.
Conclusion
Understanding the differences between machining allowance and tolerance is crucial for precision in manufacturing. These principles ensure parts fit perfectly and function as intended, reducing production errors and costs. By mastering these concepts, engineers can enhance product quality and efficiency, making them essential in the evolving landscape of manufacturing technologies.
Your Specialist in Machining and Manufacturing
ChansMachining stands out as a leader in rapid manufacturing and prototyping services, specializing in precision machining. Our state-of-the-art CNC technology, paired with our team’s extensive expertise, ensures that we can achieve exceptional quality standards and meet stringent production requirements.
Whether you need components with precise tolerances or guidance on selecting suitable tolerances for your engineering applications, ChansMachining is your reliable partner. Reach out to us with your questions and project needs today!
